Nothing is more frustrating than falling because your foot slipped. It's not frustrating because you passed the crux, were still fresh, or had just one move to finish your project. No, it's frustrating because it's preventable.. Nothing is more frustrating than slipping down a rock wall at the foot. The tragedy does not lie in saying that you have passed the hardest part of the journey, and you are still not completely satisfied. It is not because you can complete this route in one step. The reason for the tragedy is that it could have been avoided. I started climbing in 1998 and, before long, climbed five days a week. My first coach was Andrew Wallach, a local strongman and the head routesetter at Vertex Climbing Center, in Santa Rosa, California. Whether Wallach's Silent Feet drill was simply a new Way to torture "Team Vertex" is debatable. What's not, however, were the results. As a young competition climber, I learned to pare away slop and inefficiency. I started rock climbing in 1998. Since then, I have climbed five times a week. Andrew Wallach is my first coach, it is our strongman, and is the chief scheduler of the Vertex climbing center in Santa Rosa, California. Whether or not his ghost walking training is just a new trick for torturing the "Vertex team" is different. However, it is generally accepted that it is the effect of this training method. When I was a young athletic climber, I learned how to climb effectively. Wallach's exercise was simple: if your foot squeaked or smedged audibly when you placed it, punishment ensued — for me, this was a 200-foot gym traverse. Choose your own torture, but the key is to have someone nearby call you out. ( Thanks to hollow indoor-climbing surfaces, making this call should be easy. And if you're climbing outside and clomping like Lord of the Dance, this drill is for you.) Wallach's training method is very simple: If you make any noise in the process of getting on your feet, you have to be punished - in my case, it means to move the 200-foot-long rock pavilion across. You can also be punished by other methods. The key is to have someone on the edge to supervise you. (Fortunately, the indoor rock wall is hollow. It is easy to judge whether or not to foul. When you climb in the wild, it may be difficult to hear it, but if you squeak like a dancer, you will be fine.) As your main points of weighted contact, your feet matter. Placing them silently forces you to be deliberate and aware with your choice, placement, and movement onto and off each foothold. Here's how: As your main focus, the foot is very important. Not speaking when you are on your feet will force you to think carefully when you touch or leave each foot, and you will be fully aware of your movements and movements. Let's talk about the method below: Shoe Design Shoes design First of all, we must deeply understand this key principle: All climbing shoes are designed to concentrate on your big toe, making him the main fulcrum of body rotation. As the strongest part of your foot, the big toe is longer (usually) than the other toes, and the other toes must listen to his command: whether you are using the sole of the foot, the side of the foot, or on the eaves against the falling force, the big toe is passed The core point of tension. So, if you don't stand on your big toe (or you can't turn the foot centered on it), it will cause your body to fall like a gyro or force you to re-point it, which will increase fatigue and tremble. The Only Foot Placements You'll Ever Need All kinds of footwork 1.Frontstep This is the simplest, most stable position. Point your foot into the wall and place your big toe directly on the hold (left foot in photo below), resulting in a squared-off stance. You can also use a frontstep in conjunction with a The key to Silent Feet is slowly and simultaneously to contact the wall's vertical plane and The foothold's horizontal aspect — so visually track the movement. Imagine the rock has wet paint on it — will your foot leave lines or dots? You want to leave the smallest imprint possible: a microdot. 1. Frontstep This is the simplest and most stable one. You need to put your toes against the rock wall and use big toes to touch the foot points (as shown in the left foot), so that you naturally develop a posture that is ready to take off. At the same time, you can also use the plus feet and backstep to achieve better stability, as shown in the figure. Ghost Steps: First, straighten your arms and hang your entire body in a rest position to experience the way you step. The key to the ghost step is to slowly and naturally contact the vertical surface of the rock wall and the horizontal surface of the foot - so you need to look at the movement of the foot with your eyes. It's like imagining that there are paints on the rocks - is it a line or a point where your feet step on? You should try to keep the footprints as small as possible: slightly. 2.Instep ?Silent Feet Instep Method: Lean out from the wall and spot your foothold. The key is to weight your attached foot, giving you the freedom slowly and precisely to place the hovering foot. Externally rotate your hip, allowing you to use your big toe's Noisy, sloppy footwork stems in part from a rigid ankle joint.. 2.Instep (inside foot) Inside the shoe is used the edge of the inner side of the shoe, also use big toes to stand. The obtained standing position - if both legs use internal legs - is the so-called "frog leg"; this step is very beneficial to stepping on the high point, as shown in the Bishophighball Footprints (note: a name in Bishop, California). Footprint's bouldering circuit with difficulty of V9 or E6) Footsteps within Ghost Steps: The body explores the rock wall to observe the foot. The key is to take the weight on the passive foot so that the suspended foot can move with enough freedom to move slowly and accurately. With the buttocks inward, you can use the inner edge of the big toe naturally. After touching the rock face, relax the feet to absorb the weight. Rough footwork is often caused by stiff ankle joints. 3.Backstep Learning to backstep (drop-knee) is slightly possibly the most important technique for overhanging rock. Like a row of dominoes, it creates a “wave of extension†that lengthens your body: the pivoting of your toe into a backstep drops your knee, Which in turn elevates your hips, driving movement upward. The backstep, or outside edge of the shoe, is also often used when stepping through. This move on Bishop's Secrets of the Beehive (right) requires a classic backstep.Silent Feet Backstep Method: Set up as if initiating a frontstep or instep: arms straight, weight first on your attached leg. This time, internal rotate your hip, exposing your shoe's outside edge to the hold. As your foot making slow, deliberate contact, point your toe down , raising your ankle and driving the movement upward from the power point of your big toe. 3.Backstep (outside) Learning to use the outer leg (knee-dropping action) is the most important technique for climbing the outer wall. Just like the domino effect, it produces a “stretching rhythm†that allows your body to stretch longer: the action of rotating the toes to the outside will make your knees go down and then raise the hips. rise. This kind of footwork is also often used in transitions. As shown in the figure on the right, passing the Bishop's Secrets in this honeycombed zone is the classic application of external steps. Steps beyond Ghost Step: Use a starting action like a right foot or an inside foot: a straight arm with weight on the driven leg. At this time, turn the hips inward and touch the outer edge of the shoe with the foot point. When your foot is stepped on slowly and firmly, flush your toes down, lift your ankles, and use the power from your toes to drive your body upwards. Kevin Jorgeson still uses stillent Feet, ensure precision footwork when it counts . . . 40 feet off the ground on the FA of Ambrosia (5.14 X). Funny Games Fun exercise Learning to use and place your big toe effectively and precisely is the goal. Here, three Silent Feet drills to hone your skills: It is our goal to learn how to effectively and accurately use the big toe. Here are 3 ways to practice Ghost Steps: Team up. If your feet make a sound, you must repeat the boulder problem or route. Don't move on (or letyour buddy move on) until you feel you’ve climbed as cleanly as possible. Never settle for slop. Extend astrip Of electrical or painter's tape laterally across the bottom of your shoe, from just under your big toe tothe pinky toe. If you step anywhere other than your big toe, you'll quickly feel a difference in friction andhave to make the necessary adjustment. Do Vary moves — such as reversible drop-knees during atraverse — off the same set/s of footholds. This will test your foot placements as you pivot between body positions. If you're using your big toes correctly, you should have no problem keeping your Feet on. 1. Divide into teams. If your feet make a sound, you have to climb the line again. Don't stop or change people until you feel very clear about climbing. We must not be lazy. 2. Tear off a piece of tape used by an electrician or painter and stick it horizontally to the bottom of the shoe, with the card from the big toe to the little toe just below the big toe. So once you tap on any point except the big toe, you will quickly feel the difference in friction and make adjustments. 3, change the footwork - for example, in the process of traversing at the same foot points in reverse knee action. This will check your footsteps as you switch between body positions. If the big toe is used properly, you should be able to keep it very smoothly. Responsibility editor: Xuantian The dining table and chair combination in a restaurant refers to the combination of tables and chairs used for dining. According to different needs and styles, restaurant dining table and chair combinations can be classified into various categories. The following will classify and introduce common dining table and chair combinations in restaurants. Beach table, beach chair,dining furniture Foshan Shengshi Zhihui Technology Co., Ltd. , https://www.officeroutdoorfurniture.com
First, let this key principle marinate: climbing shoes are designed to focus power into your big toe, making it the main fulcrum around which your body rotates. The strongest part of your forefoot, your big toe sticks out the farthest (usually), forcing The other piggies to follow its lead: whether smearing, edging, or bearing down on an overhang, it's the action point for translating tension through your core. Thus, if you don't stand (and rotate) over your big toe, your shoe Will either pivot you off like a dreidel spun on its side or force you to reset your foot, increasing fatigue while you dither. 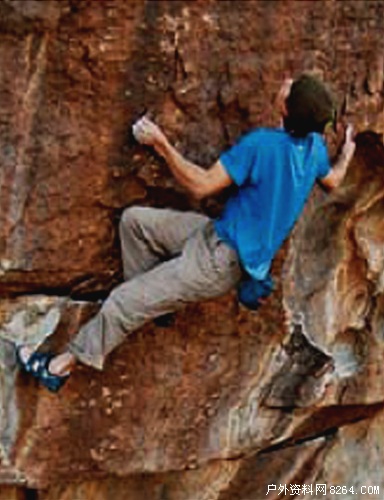
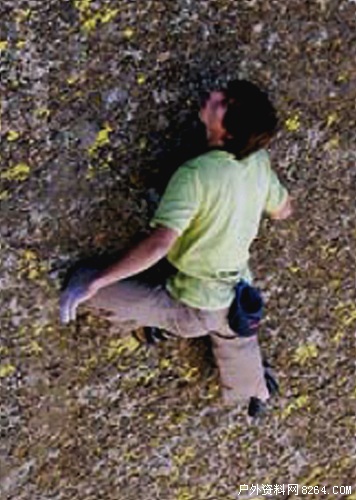
The resulting position — if instepping with both feet — is the "frogleg"; it's high to step, as with this slab move on the Bishop highball Footprints (right) . 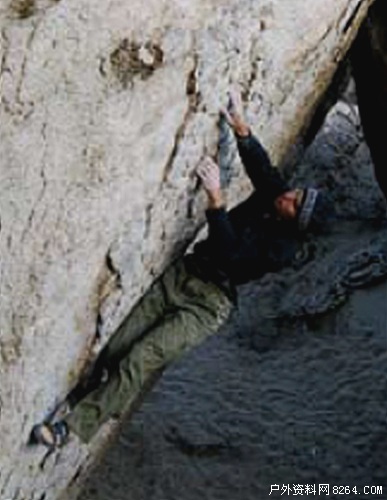
.
1. Classified by purpose
1) Dinner table and chair combination: mainly used in formal dining venues, such as high-end restaurants, banquet halls, etc. The combination of dining tables and chairs usually uses high-end materials such as solid wood, marble, etc. The chairs are generally equipped with soft cushions to provide a comfortable dining experience.
2) Fast food table and chair combination: mainly used in fast food restaurants, coffee shops, and other fast-food restaurants. The combination of fast food tables and chairs usually adopts a simple and practical design. The tables are generally small, and the chairs are generally made of plastic or metal materials, which are easy to clean and move.
3) Outdoor table and chair combination: mainly used in outdoor dining venues, such as outdoor restaurants, balconies, etc. Outdoor table and chair combinations usually use materials with special treatments such as waterproof and anti-corrosion, such as aluminum alloy, plastic, etc., which have the characteristics of durability and easy cleaning.
2. Classify by Style
1) Modern style table and chair combinations: Modern style table and chair combinations usually adopt a simple and streamlined design, emphasizing practicality and comfort. The combination of modern style tables and chairs is suitable for modern restaurants, cafes, and other places.
2) European style table and chair combinations: European style table and chair combinations usually adopt gorgeous carved and curved designs, emphasizing details and decoration. The European style table and chair combination is suitable for high-end restaurants, banquet halls, and other places.
In summary, restaurant table and chair combinations are classified based on factors such as purpose and style. Different classifications are suitable for different types and needs of restaurants, and choosing the appropriate combination of dining tables and chairs can provide a better dining experience and comfort for the restaurant.
Rock climbing technology shares the magical power of sports ghost steps [Pic]